Saturday, December 28, 2013
Help Lift the Ban on DisneyScreencaps.com!
I was very sad to discover that one of my favorite websites, disneyscreencaps.com, has been banned by Disney. This website provided high quality screencaps of pretty much every disney movie. You were able to go through and appreciate all the background beauty in disney movies, and i most often used these screencaps for doll references when making outfits or movie accurate accessories. There is no other website that even comes close to how useful this fan site was. But now it's been blocked. I get it, Disney owns the images of course, but this site didn't make any money. I'm pretty sure the person who runs it spends a lot more buying all the movies on blu ray and hosting the site than anyone i know. Someone started a petition to bring back this wonderful website in the name of disney fandom. So, if you have a moment, PLEASE consider signing to bring back such a wonderful asset to the artistic community and true disney fans. <3
Wednesday, December 11, 2013
How To Curl Doll Hair PART 2!
Make sure to read part one first, or you're going to have a bad time. ;)
We're back! After almost 2 months of leaving your dolls stranded in curlers, here's how to finish the curling process! (Don't worry, this is MUCH EASIER than part one!)
We're back! After almost 2 months of leaving your dolls stranded in curlers, here's how to finish the curling process! (Don't worry, this is MUCH EASIER than part one!)
Step 11: Boil!
In preparation for boiling, Briar shed her washcloth and folded down the top of her dress. Since we were doing of tutorial, she sported a cute bandeau top to stay decent. If your doll is curling privately, I would just remove all clothes. (However, I'd keep Ever After High doll tights and shoes on. Apparently they're hard to get back on)
Find two ceramic containers (or anything that can withstand boiling water safely and ice water) that your doll's head will fit in. Luckily I own some cavernous mugs. We will be doing a hot water dip followed by an ice water dip to set the curl. On different dolls I've had to use bowls to hold their big heads.
The set up: Have everything ready at this point because you will need to move quickly. I have one small pot with enough water to fill the mug in it, and two mugs. I pour the hot water into the mug next to the stove. The mug on the right is full of cold water and crushed ice.
Once you have everything handy, boil the water. You CAN technically just hold the dolls head in the water in the pot, but this scares me and you can overheat and melt her hair if you do it wrong. The mug makes me feel more in control because it's not actively being heated. If you DO dip her in the pot, just avoid contact with the metal bottom and sides. She will melt.
I didn't let my water get quite boiling because I wanted the curls to be looser to match Briar's look. I took it off the heat at this point. If I did it again, I would let the water get a bit hotter, and reach a full boil before I poured it in the mug.
Now dip her head so All her hair is submerged. Keep away from her face paint! (I would actually reinsert her earrings before dipping now that her hair is in curls. Her ear holes shrunk a tiny bit from the ice bath and I had to rub them with a cotton bud with warm water so her ears would expand a bit and let the earrings back in. Not a huge issue but looking back I would put them back in before boiling.
Stick her in the hot bath for 30 seconds to a minute, not much longer but it doesn't have to be exact. More like guidelines than actual rules. ;)
Then immediately transfer her to the cold bath. Leave her in the cold bath for 3 to 5 minutes. This sets the heat and lets her hair keep the curls better. The ice will probably melt. :)
After that, remove her from the water and gently blot her hair dry. RESIST THE URGE TO TAKE THE CURLS OUT IMMEDIATELY. You don't want to ruin your hard work, do you?
Step 12: Wait.
She needs to sit for THREE DAYS and air dry. Three. Days.
 |
| "Three Days" |
It's hard but necessary. Don't try to dry her hair with a blow dryer to speed it up. Air dry all the way.
Step 13: Style!
After the three days, touch her hair to make sure it's 100% dry, then the fun begins.
Start at the bottom section, and work left to right or right to left.
Gently pull out the pins and unravel the curls. Pinch right about the foil and then pull it straight down to remove the foil tips.
If a curl comes out messy, wet your fingers with water and smooth it back into shape. Try to work with the curl, not against it when you take out the straws.
Separate thick curls into 2-3 smaller curls by very gently pulling them apart with your fingers. Make sure her hair looks full.
Move onto the middle section, and finally the top. Replace her accessories if you haven't done so.
Style the curls into place with your fingers. do NOT brush through the curls, they will all come out. There will still be some loose hairs, but don't stress about them. Hopefully you have achieved a lovely and soft hairstyle!
Her hair will relax a bit (that is just the nature of the fiber) but Briar's hair is pretty loose in the cartoons. If you want the curls to stay tighter, boil the water for longer so it sets the curls at a higher temperature.
My Briar's hair relaxed to this point after about a week, but it hasn't gone past this and I curled her hair over a month ago.
Step 14: Enjoy! Take some pictures of your hard work! :) And enjoy your doll's beautiful new hairstyle!
Before:
After: (One month Later) (after boil curling and a month of natural relaxing and posing)
Pictures:
Saturday, October 19, 2013
How to Curl Doll Hair: Briar Beauty Edition
Here at last is my tutorial on how to fix Briar Beauty's hair! I'm sorry this took so long to put up, but I'm in college now and have a lot more demands on my time. Those parties aren't going to throw themselves... ;)
Anyway. Here it is. I tried to make it as "fool-proof" as possible. I made my own tutorial because I was never satisfied with anyone else's tutorial. I tried to make this step-by-step from washing to curling to styling. Hopefully it helps!
If you have any questions at all about the process, please comment below. :)
Here we go:
If you have any questions at all about the process, please comment below. :)
Here we go:
Apple: Briar, are you sure you want to go through with this? I hear it's dangerous….
Briar: Oh, don't be such a worry wart! It will be an adventure!
Apple: Good luck!
Comparison of Apple and Briar's hair. Notice how dull and unhealthy Briar's hair looks.
Let's change that.
Things you will need:
- Foil (preferably heavy duty or layered regular foil)
- Normal size drinking straws (or change it up for different size curls like coffee straws for small curls or smoothie straws for big ones)
- Straight pins (preferably pink ;)
- A willing doll subject
- Small towel for blotting
- Shampoo and conditioner (most brands should work, I just used Dove because that's what I had on hand)
- Pot for boiling water (and parental supervision if you're young!)
- Mugs or bowls to hold water.
Step 1: Remove Briar's Accessories and prep her for washing. I was afraid to take off this shoulder/necklace thing at first because I wasn't sure how well it would go back on. It's easy to put back on. Go ahead and take it off.
I also removed her earrings so her hair wouldn't get caught on them.
I bundled Briar while washing her hair so her clothes would stay dry, but I would just go ahead and remove them at this stage. The wash cloth is easy to hold however, so you might want to still do it. It's up to you.
Step 2: Rinse her hair in lukewarm/slightly cold water. I did this with her hair hanging down into the sink. Avoid getting lots of water on her face and keep it away from her neck and joints! You don't want to invite mold. I also kept the water away from her roots to avoid excess water entering her head. NOTE: Briar's "knot" of hair on her hairline is pretty fussy, and I stayed COMPLETELY away from it during this whole process. You'll thank me later.
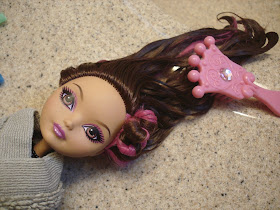
Step 3: Brush the hair while wet. It works best to brush her lying down like this. Keep a gentle hold on her head with one hand so you don't strain her neck joint. Disney Princess brushes are my favorite for 12 inch dolls. :) They are very sturdy and work best for me. This step helps eliminate knots and works the water into the hair. Any original box curls will disappear in this step, but the boil ones will be better. ;)
Step 4: Shampoo
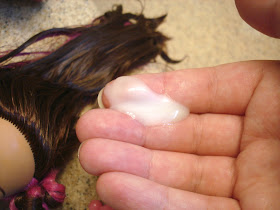
Use about a penny size of shampoo on her hair. Again, Most kinds will probably work. Just keep it basic. Massage it through her hair gently with your fingers. Keep the shampoo away from her scalp and face. This eliminates any gross product already in her hair and makes it easier to work with.
It will get pretty sudsy. Do this in the sink. :)
Step 5: rinse the shampoo out using the techniques in step 2. Work through her hair with your fingers to get the suds out. Stay away from the scalp and twist!
Step 6: Condition
This step is the most important. Use a little more conditioner than shampoo. Work it gently through her hair with your fingers. This makes her hair silky smooth and shiny at the end. :) You don't want so much that her hair is goopey, it should disappear as you work with it, but make sure her hair feels silky. DON'T immediately rinse it out!!
Step 7: Brush with Conditioner. Now brush her hair the same way as step 3 but WITH the conditioner still in her hair. This helps get out all remaining tangles and coats the hair evenly with conditioner.
After her hair is effortless to brush lying flat, stand the doll up and brush itas it would fall naturally. This part is nice to have her wrapped in a washcloth. Some suds will probably appear near the ends of her hair as you continue to work with it. One you are sure her hair lies nicely standing up, move on to step 8.
Step 8: Rinse with cold water. The cold water helps seal in the shiny silky feeling. I'm not sure how, but it just does. (It works on humans too!) Work it gently with your fingers to make sure the conditioner is well rinsed out. However, her hair should still have some of that silky feeling to if and it should not feel dry.
Step 9: blot hair gently with a towel so she's not dripping everywhere. This removes large amounts of excess water, but her hair should still be fairly damp. You're not trying to dry it in this step, just make it easier to work with.
Step 10: CURL
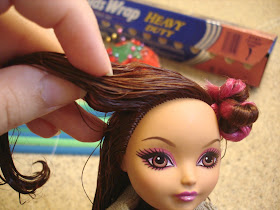
Start sectioning off her hair and curling it. You don't want huge sections, but you don't want tiny ones either. This picture shows sectioning her bangs, but I would suggest starting at the back of her hair. (remember, this was my first time. :)
Just like a hair stylist, use little clips to keep the middle and top sections away while you're working. I divided Briar's hair into 3 sections horizontally. The bottom (closest to her neck), the middle, and the top (this included her bangs mostly and the hair that frames her face)
Break down of how to make a curl: Take a small section of hair (the one shown here is good)
Rip a small piece of foil to fold over the ends. You do this to ensure her hair gets curled at the tips. It also makes it much easier to start the curl around the straw. I used heavy duty foil so it would have a stronger hold, but you can just fold normal foil into this size 2-3 layers thick and it should work. Make sure the ends are lying as straight as possible in the foil so they curl in the right direction.
Once the ends are foiled (the piece in the picture below is too big, I was experimenting, but the process is the same) curl it around a small section of drinking straw. You can either cut the straws before you curl, or simply curl it with the whole straw and then trim the straw once you have it pinned. This is sometimes easier to manipulate.
Curl the hair all the way up to her scalp.
Once at her scalp, push a straight pin through the straw and into her scalp. It is MUCH easier if you take the time to stick the pin through one of her hair plug holes. It will go in and out smoother. Plus, sticking pins just into her vinyl made me nervous. Push it in until the pin head is nestled in the hair.
Her hair is easiest to curl when damp. If the hair starts drying out while you're working on it, wet your fingers or doll brush with water and smooth it through her hair to wet it.
****Pay attention to which direction you are curling the hair. Curls framing the face should be curling away from her face. The ones on the back of the head don't matter as much, but keep it varied to achieve Briar's carefree look. Basically, you just don't want all of your curls going in the same direction because they'll look too uniform.
Continue sectioning and curling the entire "bottom" section. I ended up using 12 curls for her entire head since I left them pretty thick, but use as many as you want.
Once her bottom section is all curled, move onto the middle, keeping the top clipped out of the way. I did some normal curls in this section, but also tried this alternative technique to have some variety in texture in size. (it worked really well)
To do this, section the hair like normal. Before foiling and curling, twist the hair tight on itself kind of like a rope (see picture) Then apply foil, and curl up straw and pin as normal. It adds a tighter coiled look. :)
Then move onto the top section. I saved her bangs for last because they're a bit tricky. Twist the strand slightly (but not as tight) AWAY from her face. Then foil, curl and pin also away from her face. (so you're curling towards the back of her head.) Otherwise her bangs will flop down in her face. Unless that's the look you're going for, then go for it. ;)
All curled! Be patient, this takes a while but needs to be done right!
Okay, this is getting ridiculously long. If I want it to upload with all these pictures, I'll have to split it up. So stay 'tuned for part 2: BOILING, WAITING, AND STYLING! :)
Okay, this is getting ridiculously long. If I want it to upload with all these pictures, I'll have to split it up. So stay 'tuned for part 2: BOILING, WAITING, AND STYLING! :)


